Henchman Cosplay Tutorial
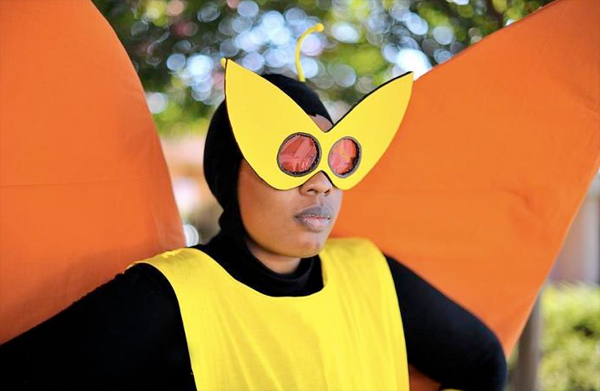
If you’re anything like me, you want to be a Henchman.
I know for a fact that when I first started watching The Venture Brothers, I was more so wanting to be best friends with 21 and 24 rather than be friends with Hank and Dean. And most of the time, the female Henchman cosplayers are in a skirt… no offense to them, but I am ALL ABOUT the shorts.
You could imagine my excitement when I FINALLY got the chance to start a costume and fully becoming one. I didn’t really want to be just ANY Henchman, in fact… I wanted to be 24!
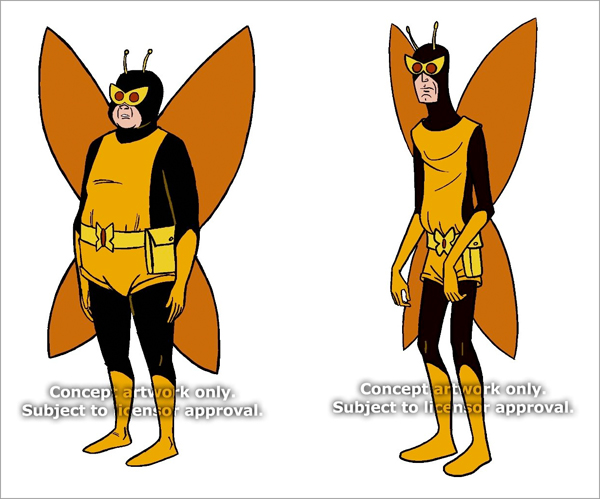
Henchman 24 is tall, lanky, and nerdy in every way. His death in the show was quite disappointing but I vowed to keep his memory alive!
When I had first sat down to deconstruct his costume so I knew what exactly I wanted to do for each part, I actually thought that I wouldn’t be able to complete him! This was in fact the FIRST costume that I made on my own (with some tiny help from my Dr. Mrs. The Monarch) and I was flipping TERRIFIED! But I kept in mind that this was a GREAT way to officially enter the cosplay world (even though I had done some small crappy cosplays before him).
Sacramento Anime Summer came around and I was ready to go! I had everything done and I knew it was going to be a blast to walk around as a Henchman (even though it was 100 degrees outside there). And when I finally got to put him on, the response was overwhelming! It was a success!
While I was there, a lot of people kept asking me “How did you make your wing!? They’re so big!” and I had to quickly explain how I made them but it seemed a lot of people were either still confused or so impressed (not sure why). So this post I am using to fully explain every step on how I created my onw Henchman 24 costume (with a low budget).
Let me preface this by saying that at the time, I didn’t have the full body zentai suit that most of the Henchman cosplayers wear underneath the yellow of their costume. Mine was still in China about to be sent to me!
Lets start with the wings, since those were the most interesting part of the whole costume:
The wings themselves were a bit difficult to make. I wasn’t sure how to go about making them at first but quickly got an idea once I heard that my mom’s job had a few cardboard boxes to spare! When I had originally done research on Henchman costumes, all the ones that I came across had rather small wings. I figured if I was going for it, why not try to make it as accurate as possible and give myself some HUGE wings!
In the photo above, you can see that his wings do in fact reach a bit over his head. Me being almost 6’0 if not 6’0, that would mean rather large ones to fit my frame AND be tall enough. I cannot tell you how many times I drew and redrew these wings!
So what I did to get these beauties was I had two REALLY big cardboard boxes from my moms job. I cut one of the creases on the box so that it laid flat really long. I then drew out the shape of ONE of the wings (using a few reference photos so I knew the proper shape) I also drew it so that it had a rectangle sticking out of it on the inside so that I could attach the two wings together and that it laid flat against my back. I aslo had to keep in mind carrying these things to and from cons. So I made it so that they fold hamburger style (remember that in school? haha).
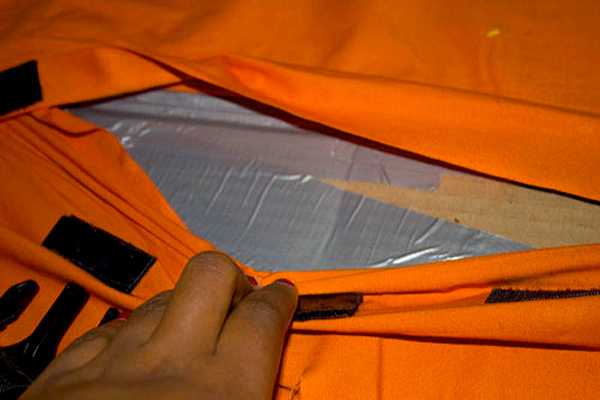
Once I cut out the one wing shape, I did the same thing to the other box but used the first wing as a template. I attached the two sides together with duct tape and then went and did a full layer of duct tape around the entire thing so that it was a bit sturdier and the folds werent so weak.
NOW came the task of cutting the slits where the straps were going to be fed through. When I thought about having to have these on me I wanted to be able to hide the straps so it looked like they were kind of just on me and not held together with anything. What I did was I ultimately ended up guestimating where the wings would be on my back. I cut FOUR little rectangle shapes (two on the top and two on the bottom) through the cardboard.
Once that bit was done, I took my 9 yards of fabric, laid it flat on the ground and put the BOTTOM part of my wings on it (by bottom I mean from the middle of the wings where the fold was to the bottom of the wings that are by my legs) I traced the shape of that part of the wings but went up a few inches on both sides (because I wanted the bottom to tuck into the top sleeve). Once I had the shape I folded the fabric in half and cut, pinned and sewed. Getting the sleeve onto the wings was a lot harder than I had expected. I ended up having to force a fold hot dog style (again..with the childish terminology) in order to get them to fit into it. Once it was on, I did the same for the top..traced (adding a few inches), folded, cut, pinned and sewed. The top part was a mess..it ended up being to small (not sure now) so I had to cut a rather large slit into it and then tape it closed with clear tape once it was on. However, that part is covered with my back when I put them on so you cant see it. Also, in order to feed the straps through, I cut slits in the fabric that was going to be on my back (not the part thats on the OUTSIDE of the wings when people see me from behind) that matched up with the rectangles I cut on my cardboard.
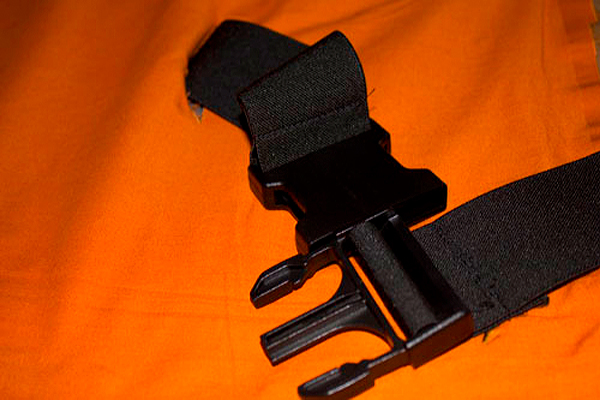
For the straps, I took about a yard of BLACK elastic and attached heavy duty buckles onto each end and then fed it through one slit/rectangle and out the other on the other side (I realized that I should have done this BEFORE putting the sleeves on but it wasn’t too big of a hassle.
Now came the task of keeping the wing sleeves together. I could have hand stitched them closed but that would have been too big of a task. Also, I wanted whatever I used to be easy to open and close just in case I needed to touch up my wings (and believe me, after debuting this cosplay at the con and all the people running into them bending them all to hell.. I needed to fix them). So I opted for… VELCRO!
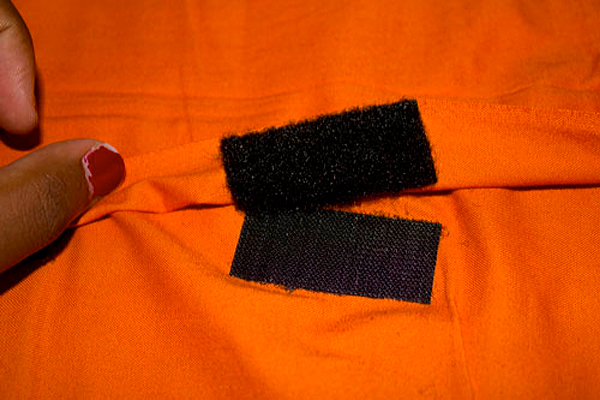
I just cut some pieces and layed them around the edge of the top part of the sleeve (the top overlaps the bottom) and then some on the bottom to keep it closed. If you’re far away, the seem looks invisible which is nice.
So, thats how I made the wings… a bit of a hassle but were really worth it in the end.
Now onto the actual clothing of the costume:
Like I said, I didn’t have a zentai suit yet to wear underneath the yellow of my costume. So what I did was buy a turtleneck and used some black tights I had.
As for the head covering, I made it out of an old black t-shirt that had some stretch to it. I just cut out a head shape (as if you were looking at a profile of a face) with a bit added for the neck (because I needed it to tuck into my turtle neck). I sewed the two pieces together and then put it on my face. At that time, there was no opening for the face because I needed to be able to know what parts I need to be open. While it was on, I took a white marking pencil and just drew the shape I needed to cut out (this part kind of hurt my face haha) and then I took it off, cut it out and sewed a hem around it to keep it from looking messy. For the antenne, I took pipe cleaners of the same yellow color and added those fuzzy balls to the tips, I put my head mask back on and stuck the pipe cleaners through making some holes so I knew where to place them. To keep them from falling out, I wrapped really thin hair bands at the ends and then sewed it a bit so that they stayed on.
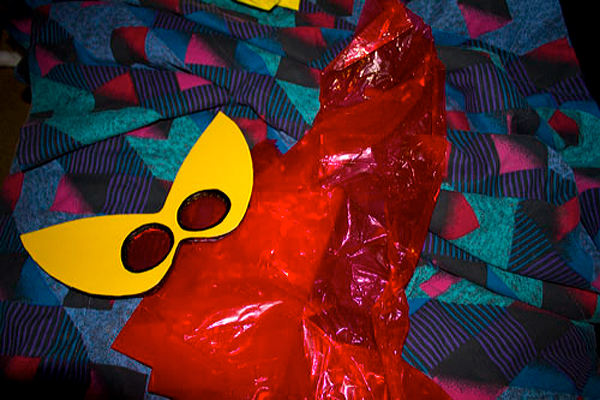
Next, the mask. The mask was just made out of thick foam which I cut to the shape of the mask. I didn’t have the proper materials (nor could I find them) to make the eye parts more realistic or cooler so I just opted to cut circles out and use red cellophane to make the red parts…red. Now, I wear glasses. And no matter the cosplay… I dont take them off. So I figured a way to connect the mask to my glasses without looking weird. Thats where good ol’ velcro came in handy again. I put a few pieces on the back of my mask and a few on my actual glasses and there ya go! It held up like a charm!
For the shorts and top I opted for simple rather than complicated. My friend (who was my Dr. Mrs. The Monarch) showed me how to make a little smock type shirt. It was simple and its all that I needed. Just two rectangles with a dip for the neck and tank top like straps. I had two of them and sewed them together. For the BACK part of the shirt, I cut the same four slits in them like I did the fabric over the wings. Why? because the straps werent only going to go around my waist and above my boobs (or under depending on what was more comfortable) but I need them to be invisible and not shown over the yellow. So I ended up feeding the straps through the shirt to put them around my body and you couldn’t even see them!
For the shorts, I took a pattern and just used it because I wasn’t familiar with short making. I made them a bit bigger than the pattern called for because during a trial pair the biggest size in the pattern was too small. Once I had them together it was smooth sailing from there. I opted to keep them as two different garments because when having to use the bathroom I didn’t want to have to deal with trying to take off a jumpsuit haha.
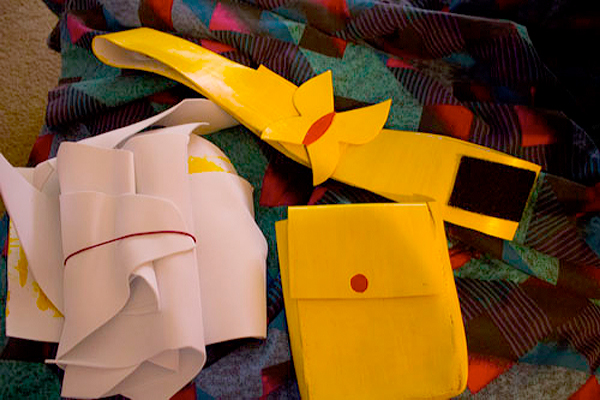
Next up was the belt! Foam had been working for me with the mask so I opted to use it to make the belt, the buckle and the little satchel thats attached to it. The foam that I got was a nice roll of white for about $7 at JoAnns. It came in handy when needing to make a few things and it was a nice cheap option. Once I had the belt and bucket shape cut out I painted them the proper colors and added velcro as the thing that held the belt closed. For the satchel, I ended up cutting four pieces and hand sewing them together and then I made one more shape for the part thats used to close the satchel and sewed that on too. I then painted it the right colors and added velcro on the back of it to attach it to the belt.
Lastly, the boots. This was challenging because I didnt want to BUY boots because all the ones I had found were not working out in terms of being the right style. I remembered that I had a pair of Ugg boots that I no longer wear (unless it to the laundromat) and I could use those and put some covers over them. This was my first time making shoe covers but it ended up working out in my favor. So I made some shoe covers but made them a bit taller so that I could tuck and safety in them to the boot inside.
I don’t have a proper photo for the boots because the next time I wear Henchman I am gonna go for a more sock like thing so they’re more form fitting to my legs like the actual Henchman wear.
I bought the gloves from We Love Colors because I couldn’t make them on my own.
Now I think that’s about it for the deconstruction of my costume. I hope this comes in handy for someone who might want to become a Henchman themselves! I would like to thank everyone who complimented my costume and I want to punch everyone who kept running into me bending the hell out of my wings!
I would say the most expensive part of this costume was the fabric to cover the wings. I had to get 9yds of that stuff! But everything else was fairly cheap or free (thanks mom!).
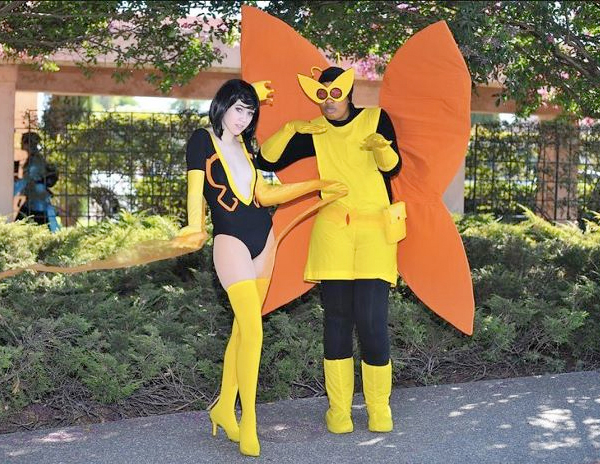
Here is a photo of the finished product. I would like to thank Surf Sama for taking these!
Discuss this story in our Venture Forums! Follow @VentureBrosBlog on Twitter and be sure to “LIKE” us on Facebook for the latest Venture Bros. Cosplay!
Written by Alyx Rice, Halloween Everyday
[Venture Bros. Blog]
