Sergeant Hatred Cosplay Tutorial
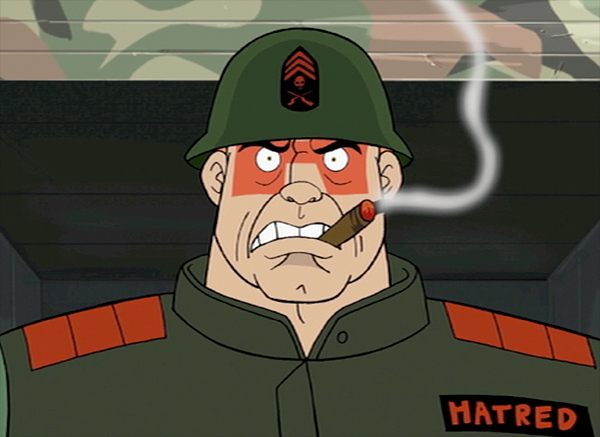
Sergeant Hatred is that lovable, overly enthusiastic yet needy villain with a dark past. He isn’t afraid to scrap but keep him away from his own demons. In the series he’s gone full circle from OSI to double agent to villain back to a good guy. Just because he has gone in circles doesn’t mean you need to when making his costume.
First let’s do the break down what you’ll need:
- Fatigue pants, green.
- black army boots, with red laces.
- Black gloves
- Flak vest
- Military helmet (steel pot as it’s known)
- Red face paint
- Red material, meaning red canvas, red nylon strap,red fabric or red pleather. Any of those will work.
- Paint This is for one method of making his emblem
- A computer with printer, paper and the internet.
- Marker. This can be a “sharpie” or fine point magic marker.
This is one costume where you’ll learn your local army-navy store is your friend. Don’t have one? Check thrift stores and of course online but first do your searching locally.
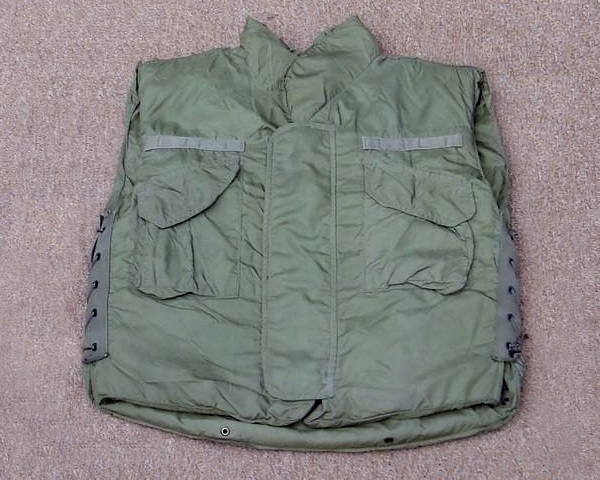
At your army-navy store you’re likely to find some olive drab fatigue pants. These were the style used in Vietnam and still in use by sheriff departments today. They’ll have a reinforced crotch (for heavy action) and some nice thigh pockets (excellent to store all your convention goodies or snacks). Find these pants in your size but know if they’re a little big that you can use a belt and most come with adjustment tabs. While you’re at the store find some black leather combat boots. The military has gotten away from polishing boots so the classic combat boots are beginning to fade away. Again find your size, lace them up and walk around the store being sure they are comfortable in all the right places. You might actually see the red laces you’ll need too. The colored laces for boots are typically used for color guards so again this is something you’ll probably find there. Next is the helmet, this is the M1 helmet and is commonly known as the steel pot. This was produced for 60 years and is the US military’s most recognizable helmet. The helmet consists of a steel pot and a fiber glass liner. These are starting to become pricey so don’t get gouged! Shop around OR if you just find the fiber glass liner that can be used for your costume instead AND it will be a whole lot lighter. Also check with your father or grandfather they might have one laying around. Now for the flak vest. This is where you can get creative with Sgt. Hatred. He wears what looks to be a custom flak vest and the Vietnam style flak vest would fit the bill perfectly the only problem is these can be hard to find. So the second choice would be an olive drab, multipocket utility vest like a hunter or photographer might wear. No luck there either? Plan C then, find a olive drab fatigue jacket or field coat. You’re going to have to remove the sleeves so don’t shell out too much money for something you’re going to have to partially destroy. Now if you’re still in the surplus store shopping spree mode you can snag your black gloves there too, otherwise just visit a hardware store or walmart.
MODIFYING THE HELMET
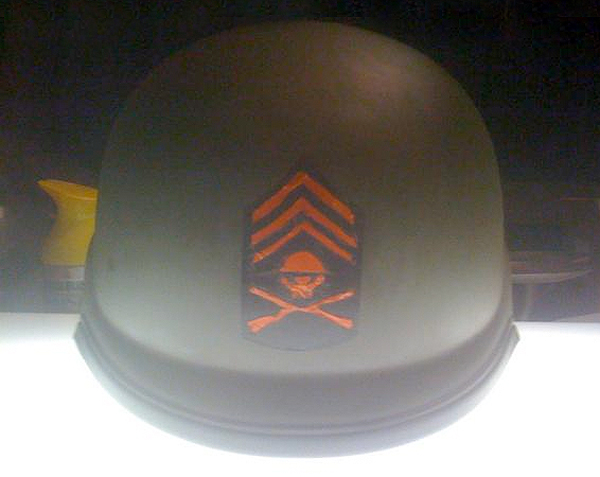
If your helmet or fiber glass liner isn’t already OD (olive drab) then you’ll need to get some spray paint. If or once it is uniformly green we need to add the Hatred emblem. Find front and center on the helmet and mark off where you want the emblem to go. I suggest using painter’s tape and taping a rectangle or box showing that the emblem will go in the center. Now this is where you can draw and paint the emblem freehand or you can use the computer to do most of the work. Either way find the emblem online. The dimensions should be about 3″ tall by 2.5″ wide. If you’re painting it on once you’ve printed the image then take scissors and an xacto knife and cut it out like a stencil. You can then center and trace the emblem inside your taped box on the helmet. Then paint away! For the 21st century method load your printer will decent quality paper, note rigid glossy photo paper but something above your standard copier quality. Self-adhesive label paper is wonderful at times. Find that emblem and scale it to about 3″ X 2.5″. Be sure it’s a good sharp image. Print it out then using scissors cut it from the page. Dry fit* the paper emblem in place and see if the size is good. At this point you could use a glue stick, elmer’s glue or spray adhesive but apply your glue to the back of the emblem. Note, don’t apply glue if you’re using self-adhesive paper. Then fit it into your space on the helmet. Press firmly and keep those edges down, flat things on a round surface don’t like to conform. With it stuck in place let’s seal it in for good measure. You can use clear spray paint to act as a sealant but if you go out and buy clear spray don’t get glossy, look for a flat or satin finish. Lightly spray the emblem and surrounding area, not too heavy and while you’re at it spray the whole exterior of the helmet for a uniform sheen. Wait 10-15 minutes and give the emblem another light spray. Now either way paint or print out your helmet should be ready.
*Dry fit: check and see if a component piece you’ve made will work with its other parts before you permanently attached it.
The red face paint is obviously for the “H” of Hatred but word of warning when you paint it on your face start small with the center of the “H”. As in most painting as we apply more we have a tendency to make what we’re painting bigger and bigger with each stroke.
The marker or sharpie is to create Hatred’s arm tattoos. These have a very tiki idol-like shape and you might need someone’s help applying them on you.
THE FLAK VEST AND CUSTOM COLORS
So you have your vest or modified field jacket without sleeves. Hatred has a couple dashes of color to the vest to tie in with his emblem and his red boot laces. His shoulder boards are red and segmented into 3 adjoining pieces, 1 set for each side. In addition Hatred has a name tag on this left side. This is black with red text. So using some red material, if you buy some at a fabric store look for something like canvas or a material that matches the material of the vest. You’ll only need a section about 1′ long by 4″ wide which is very little so don’t buy a lot. You’ll have to measure your particular vest to see how much material you need to make your shoulder boards. Now using a sewing machine, fabric glue, hot glue or seam tape make the segments for each side. They should look like a rectangle made up of 3 squares. Once you’ve made both center them one each over the seam of the shoulders and using your preferred method (glue, sewing, seam tape) attach the red shoulder boards. An easy method for the name tag is using that same red material cut it to about 1.25″ wide by 6.5 inches long. If you want pretty edges uniformly fold them over and hem them. Then take a pencil and trace out “HATRED”, all in capital letters and trace the OUTSIDE edge of the letters. Then take a permanent black marker and slowly, gently color in all of the name tag outside the letters. Other name tag methods include; getting it professionally made from a custom embroidery shop or use iron-ons. There are some great custom embroidery shops online that can make this for as little as $5 with shipping!
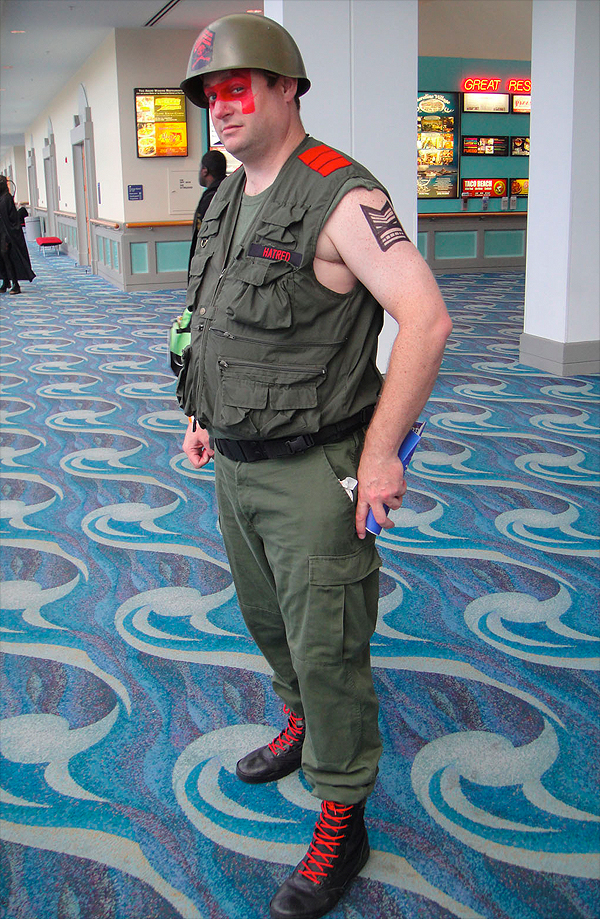
That is it! Of course you could add a holster and a M-1911 .45 cal pistol but we won’t get picky.
So now start imagining that montage from Rambo as you lace up, suit up, paint your face and put your helmet on. Better yet get 2-100 friends to dress as the Malice troop. Walk in, take charge and burn some shrubs (actual burning of shrubs not recommended).
Written by John McDonald
—
Discuss this story in our Venture Forums! Follow @VentureBrosBlog on Twitter and be sure to “LIKE” us on Facebook for the latest Venture Bros. Cosplay!

