The Monarch Cosplay – Golden Crown

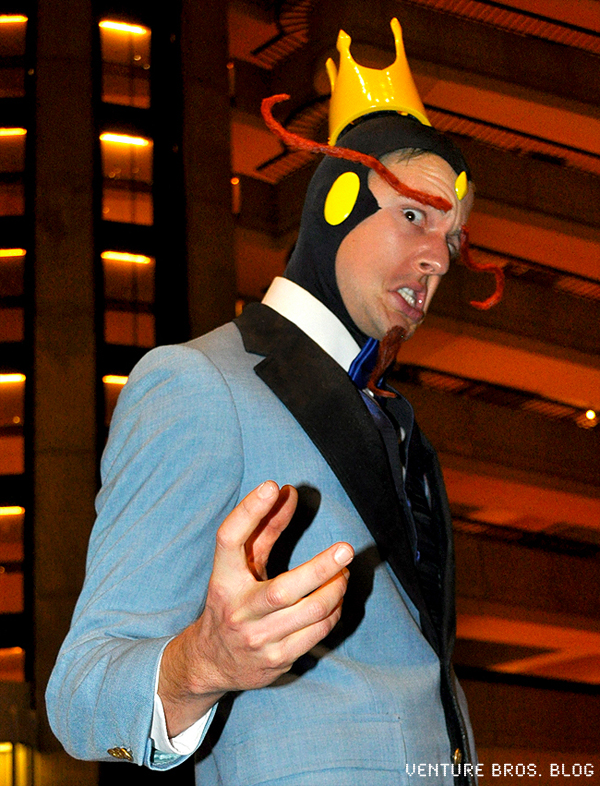
The Crown was very straightforward, and the simplest of The Monarch’s pieces to make. Notice we did not say easy – it took plenty of time, but was not intensive in any way. Essentially, you will be making a cone, sculpting some shapes on top of it, and painting the whole thing.
NOTE: We have made 3 Crowns (and three cowls). We will be detailing the process for 2 of them here.
METHOD 1: Wonderflex Method
The first step is to make a paper prototype/pattern. This is simple, but important, especially when using materials that are costly like Wonderflex (WF). Start by making a cone by rolling up some paper – newspaper works great as it’s large and stiff, but anything can work. Get the cone shape right first – this needs to be the right size on the bottom (so it fits your head) and the right height and shape (so it looks good). Remember: You’ll be cutting lots of bits out, so it will look substantially smaller/thinner later. Note where the paper overlaps for when you make your final pattern. Now draw the shape you want the crown. Before you cut it out, reinforce the skinny parts so they stand up and you get an accurate idea of the final effect. We covered ours with masking tape since we have a lot of that lying around. Then cut it out and try it on. It took us several tries to get right.
Now that you have the exact shape you want, it’s time to make it out of WF. Trace your pattern onto some WF and cut it out with scissors. Don’t cut out the points of the crown, just the basic cone (the shape of your pattern before you drew the points of the crown in). When you heat up the WF to bond the edges together and make it round, the points are going to wilt, bend, and generally cause you all kinds of grief if they are already separated. To avoid that, cut them out after you get the basic shape of the crown together. Remember: You can always cut off more WF if you want – it’s harder to put it back on.
Next you’ll sculpt the spines and points of the crown. First reinforce/thicken the spikes themselves, as well as the round bits, with scraps of WF. This makes the crown more stable, and gives it some thickness. To smooth out the spines, we used Apoxie Sculpt (AS), because 1) we had some lying around, 2) we have lots of experience with it, and 3) we love the stuff. AS is a 2 part epoxy putty that handles like oil based clay, and hardens like plastic. Work in small batches, layering it on like you would clay, until you have the shape you want. You can also wait for it to dry and then sand/carve it until everything is perfect.
Next, painting!
METHOD 2: Drink Method
It so happens that a plastic big gulp cup is the same size and shape as The Monarch’s Crown should be, making it the perfect thing to sculpt a crown on. However, the Crown is not a simple cone – it curves gently from the base to the points. To make sculpting this curve easier add several layers of cardboard both at the base and where the points would be. This also provides an easy way to keep things uniform.
Next, sculpt the surface of the Crown out of Apoxie Sculpt. Apoxie Sculpt (AS) is a 2 part epoxy putty that handles like oil based clay, and hardens like plastic. NOTE: You are still working on a complete, unmodified cup. Once you are satisfied with the shape of the Crown, let the AS cure, and then cut off the extra portions of the cup.
After all the AS is cured (a few hours, or overnight to be safe) it’s time to sand it. Use 120 grit sandpaper to start, and 220 to finish. A power-sander and Dremel will make this infinitely faster, but you’ll have to do much of it by hand regardless because of all the odd shapes. Sand until things are as smooth as you want them, then clean everything off – you want a good clean surface to paint. Since everything is plastic it’s safe to wash it with soap and water.
Next…
PAINTING
If you followed the Drink Method you can just prime and paint. If you used WF, you have a few options here.
Option 1. Prime it with several layers of primer – it’s going to take some serious coating, sanding very lightly in between. If you sand too hard you’ll go right through the paint and actually fray the WF – making the texture/fuzziness worse. You can see in the pic how the texture of the WF shows through paint.
Option 2. Gesso. We know many people who have had success with using this stuff to smooth out WF. NOTE: For various reasons we’ve never tried it ourselves, mainly its reputation for cracking and flaking off WF. Since we typically use WF when we want flexibility, that’s a deal breaker, though we’ve heard reports that this isn’t always true. In any case, you don’t care about flexibility here so it should work fine.
Option 3. Prime it with a few layers of High Build primer. You can find this at auto part stores or, if you’re lucky, Home Depot (our local store carries Rustoleum “Filler Primer”, and it is much cheaper than anything else). Unlike other paint, High Build primer is designed to very quickly build on itself (hence the name), becoming thick and easily sand-able. It may not look like it’s changing anything as you layer it on, but when you start to sand it you’ll quickly see the difference.
Finally, attach it to your cowl! There are several ways to attach the Crown to the cowl. You can use velcro, snaps, sew it to the cowl directly, or simply hot glue it in place – sadly, pinning it in place just isn’t practical. Hot glue works very well, but will ruin the cowl – we don’t recommend it if your cowl is attached to your bodysuit and you ever want to wash it. Velcro is the most convenient, since you can take the Crown off if you want. Glue one half of some velcro strips to the Crown, and stitch or glue the other half to the cowl. Use as much velcro as possible – if you can cover the whole area inside the Crown there’s almost no chance of it coming loose. With our first Crown, we used 4 small squares, one at each compass point, and the Crown gradually pulled loose from either the front or back piece over time; we had to have another person stick it back down periodically… not exactly Menacing. We have hot glued the crown on with great success, and prefer this method when using a separate hood. The only trick is to stretch the cowl somewhat before gluing the Crown in place, otherwise it will flop around a lot. NOTE: When using hot glue on WF, be very careful, as the glue is hot enough to deform the WF.
The Ears are layered pieces of cardboard with AS on top, smoothed and sanded to shape. The forehead Gem is just AS. They are painted the same as the Crown, and attached to the hood.
That’s it! Put that baby on and throw yourself a party, as only Royalty can.
Written by Steven Meissner, SoloRoboto Industries
Discuss this story in our Venture Forums! Follow @VentureBrosBlog on Twitter and be sure to “LIKE” us onFacebook for the latest Venture Bros. news!
[Venture Bros. Blog]


